How to Connect AirPods to Laptop [+ Troubeshooting]
 Fact-checked
Last Updated: February 2, 2023
Wireless earbuds are all the rage nowadays, but the crème de la crème is Apple’s AirPods. They are best-sellers in the category, and for good reason: Apple’s earbuds offer hours of battery life and have superior HD audio quality.
While they are primarily designed for iOS devices, AirPods work with other devices too!
This article will explain how to connect AirPods to laptops, how to reconnect them once paired, reasons why your AirPods won’t connect to your computer, and how to solve them.
Let’s get started!
How to Connect AirPods to Laptop
It might take you a few minutes to figure out how to pair your AirPods with your iPhone, iPad, and other Apple devices. AirPods work like any other Bluetooth device, meaning you can connect them to Windows 10 PCs, regardless of whether they’re laptops for kids, cheaper MSI gaming laptops, laptops for seniors, or Chromebooks for children.
With non-Apple devices, the process of connecting AirPods to PC requires a few extra steps, compared to Apple’s devices. You don’t need an HDMI, cable, apps, or any special programs to connect your Apple earbuds to your PC.
Connecting AirPods to a computer is a simple matter of placing the AirPods into pairing mode and turning on the Bluetooth on the laptop.
Follow these steps to learn how to connect AirPods to PC:
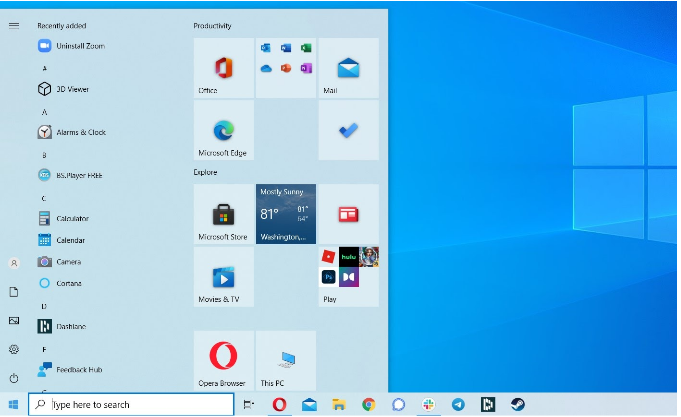
- Open the settings on your laptop from the start menu. You can also find your settings by typing in ‘Settings’ in the start menu search box.

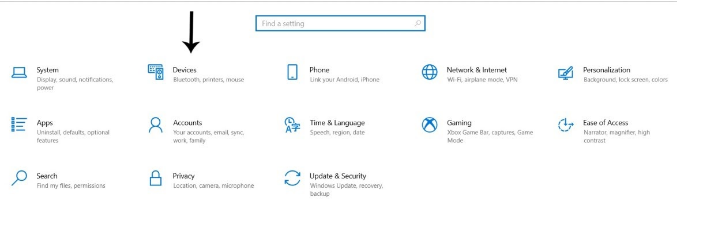
- Click on ‘Devices’.

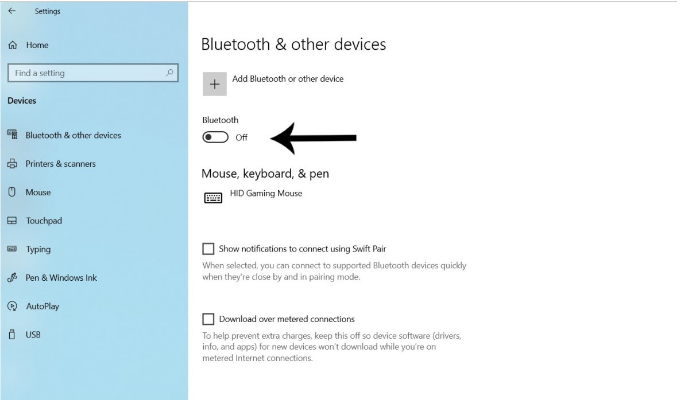
- Click on ‘Bluetooth & other devices’ and make sure that the Bluetooth is turned on. You can do so by toggling the switch at the top of the section. You can also turn it on/off in the Action Center on the taskbar.

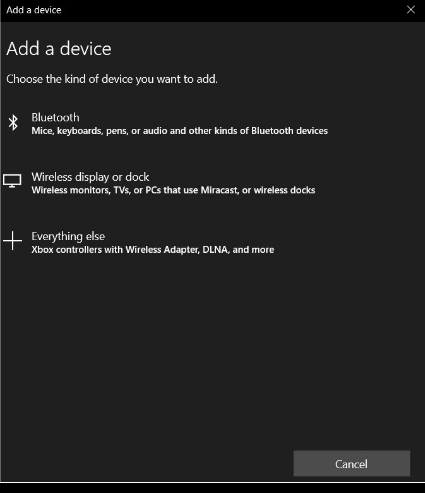
- Next, click on ‘Add Bluetooth & other devices’ and choose Bluetooth in the ‘Add a device’ window.

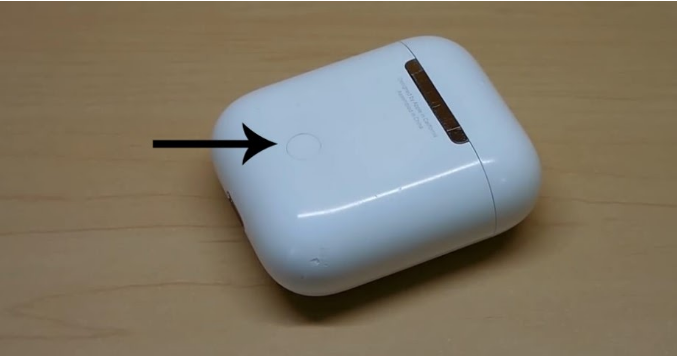
- To connect AirPods to PC, you have to place the earbuds into pairing mode. Make sure to check the battery status, as they need to be at least 20% charged for the process. Once you do so, open the case and press and hold the button on the back of it.

After a few seconds, the status light on the front of the case will start pulsing white.

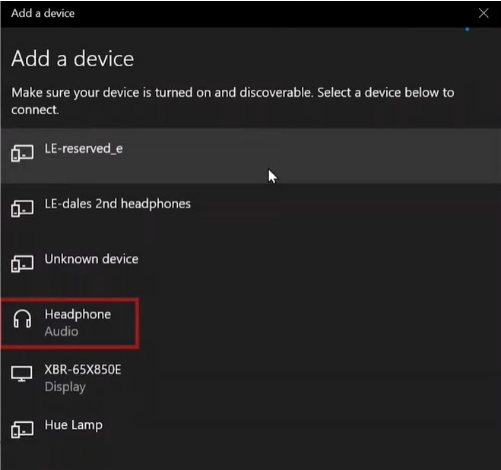
- The AirPods will then appear in the ‘Add a device’ window where the available devices are listed. They might appear under the name ‘Headphones’ and then display the name you assigned to them, like ‘AirPods’. Select the device, wait for the AirPods to pair with the computer, and click ‘Done’!

Congratulations! You’ve now successfully connected your AirPods to your PC.
| DID YOU KNOW? While it is possible to connect AirPods to your laptop, you’ll miss out on some perks. AirPods connected to non-Apple devices won’t pause music, podcasts, or videos when you take the earbuds out of your ears; it also won’t connect to Siri. |
Is There a Difference Between Pairing AirPods to a Laptop vs a Computer?
A laptop is still a computer and has the same functionalities as a traditional desktop computer. The process of pairing your AirPods to a desktop computer or a laptop is the same unless they’re running different operating systems. For example, connecting your AirPods to a Mac laptop is slightly different with fewer steps.
Key Takeaways
| AirPods are designed for iOS devices, but they can be paired with other devices as well. |
| Any device that has a Bluetooth function can be paired with an AirPod model. |
| The process of connecting AirPods to a Windows 10 device is simple and only takes a few minutes. |
| To connect AirPods to PC, turn on the Bluetooth on your computer and put the AirPods into pairing mode. |
| Before pairing the earbuds to your computer, make sure that the AirPods battery status is at least 20%. |
How to Reconnect Once Paired
Once your AirPods are paired to your computer, you’ll be able to reconnect them in a matter of seconds and listen to your favorite music, podcast, or video conference.
Here’s how to reconnect them:
- The first steps are the same as the process of pairing AirPods with PC. Go to your settings, click on ‘Devices’ and go to the ‘Bluetooth & other devices’ page.
**IMAGE** - Turn your Bluetooth on and you’ll see your paired devices in the ‘Other devices’ or ‘Audio’ section.
**IMAGE** - Select your AirPods from the list and click on the ‘Connect’ button.
That’s it! Now you know how to connect AirPods to the computer.
Reasons Why AirPods May Not Connect to Your Laptop
Sometimes, things that are supposed to work just don’t. If you’re having trouble connecting AirPods to your computer, here are several common problems and how to fix them.
- Laptop does not support Bluetooth: AirPods work with devices that can connect to an audio output via Bluetooth, meaning that if your computer does not support Bluetooth, then you won’t be able to connect it to your Apple earbuds.
Still, there is a way around it. You can add a Bluetooth dongle. Bluetooth dongles use a USB. All you need to do is plug it into your computer via an open USB port and wait for Windows to automatically install the necessary driver.
You can then revisit the steps on how to connect AirPods to PC.
- Bluetooth driver is out of date: If your Bluetooth driver is not up to date, it may cause some problems when trying to pair your AirPods to the device. Go to your device manager and expand the Bluetooth menu by clicking on the arrow next to it. After, right-click on the Bluetooth adapter and choose ‘Update Driver’.
- Bluetooth isn’t working: Try to check if your computer can connect to any other Bluetooth device. If it can’t, then there’s an issue with the Bluetooth itself. Check if there is a software update if your PC is already connected to other personal devices, and also check if Bluetooth is enabled. Sometimes, turning Bluetooth off and on again can help connect AirPods to Windows 10.
- AirPods are not enabled: Your AirPods need to be selected as the audio output device. Go to the sound control panel and set the AirPods as the default audio device.
- Compatibility (Apple users): AirPods can only connect with devices that meet minimum system requirements. With first-generation AirPods, the iOS must be running iOS10 or newer and the second generation AirPods require at least iOS 12.2.
- Bluetooth device is out of range: Try bringing the AirPods closer to the computer. You may not be able to connect them because they are out of range.
If you still can’t connect AirPods to laptop, try:
- Running the Windows 10 troubleshooter: The Windows troubleshoot option can scan for specific problems and fix these issues. Go to Settings > Update & Security > Troubleshoot > Bluetooth.
- Restart your computer: Sometimes, simply restarting a device can resolve problems like these.
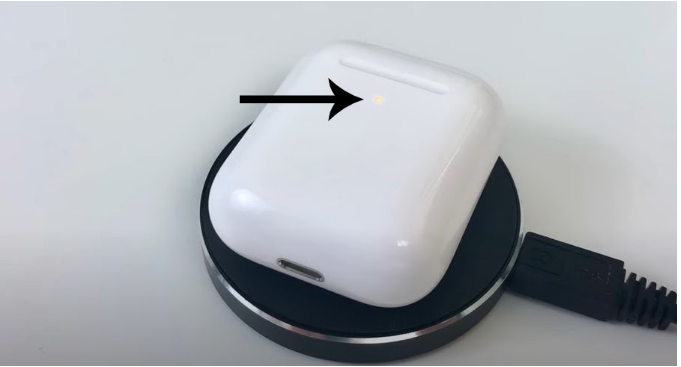
- Reset your AirPods: If your AirPods are already paired with your device, you’ll have to unpair them. Go to your settings and on the ‘Bluetooth & other devices’ page, select the Airpods, and click on ‘Forget this device.’ Place the AirPods in the case, close the lid, wait about 30 seconds, open the case, and press and hold the button on the back. The light will flash amber several times, followed by a continuous white flash. You can then try connecting AirPods to PC again.
| DID YOU KNOW? One of the reasons that might lead you to believe that there is a connectivity issue is that your earbuds are simply not charged. AirPods usually last up to five hours between charges and the case holds approximately 24 hours of charge. |
Conclusion
AirPods are primarily designed for Apple devices, but they work with any device that supports Bluetooth.
Learning how to pair AirPods to the laptop is easy. The process is simple, and you only need a few minutes to pair your earbuds with your devices! You can just as easily reconnect them.
Sometimes you might run into trouble when trying to reconnect or pair personal devices. You can try to restart your computer or reset the AirPods, and turn the Bluetooth off and on. Make sure that your AirPods are charged before attempting to pair them to your PC and that the Bluetooth on your computer is functioning.


![How to Find Someone’s Tinder Profile? [2024 Expert Guide]](https://review42.com/wp-content/uploads/2023/06/Finding-Someone-on-Tinder.jpg)